Add-on Modules
Add-on Module Feature Guide
Module Path: Super Admin Panel → Add-ons (
/addon-modules)
Required Role / Permission:Super Admin(System Owner)
System Location: Server-level module system (Modules/*)
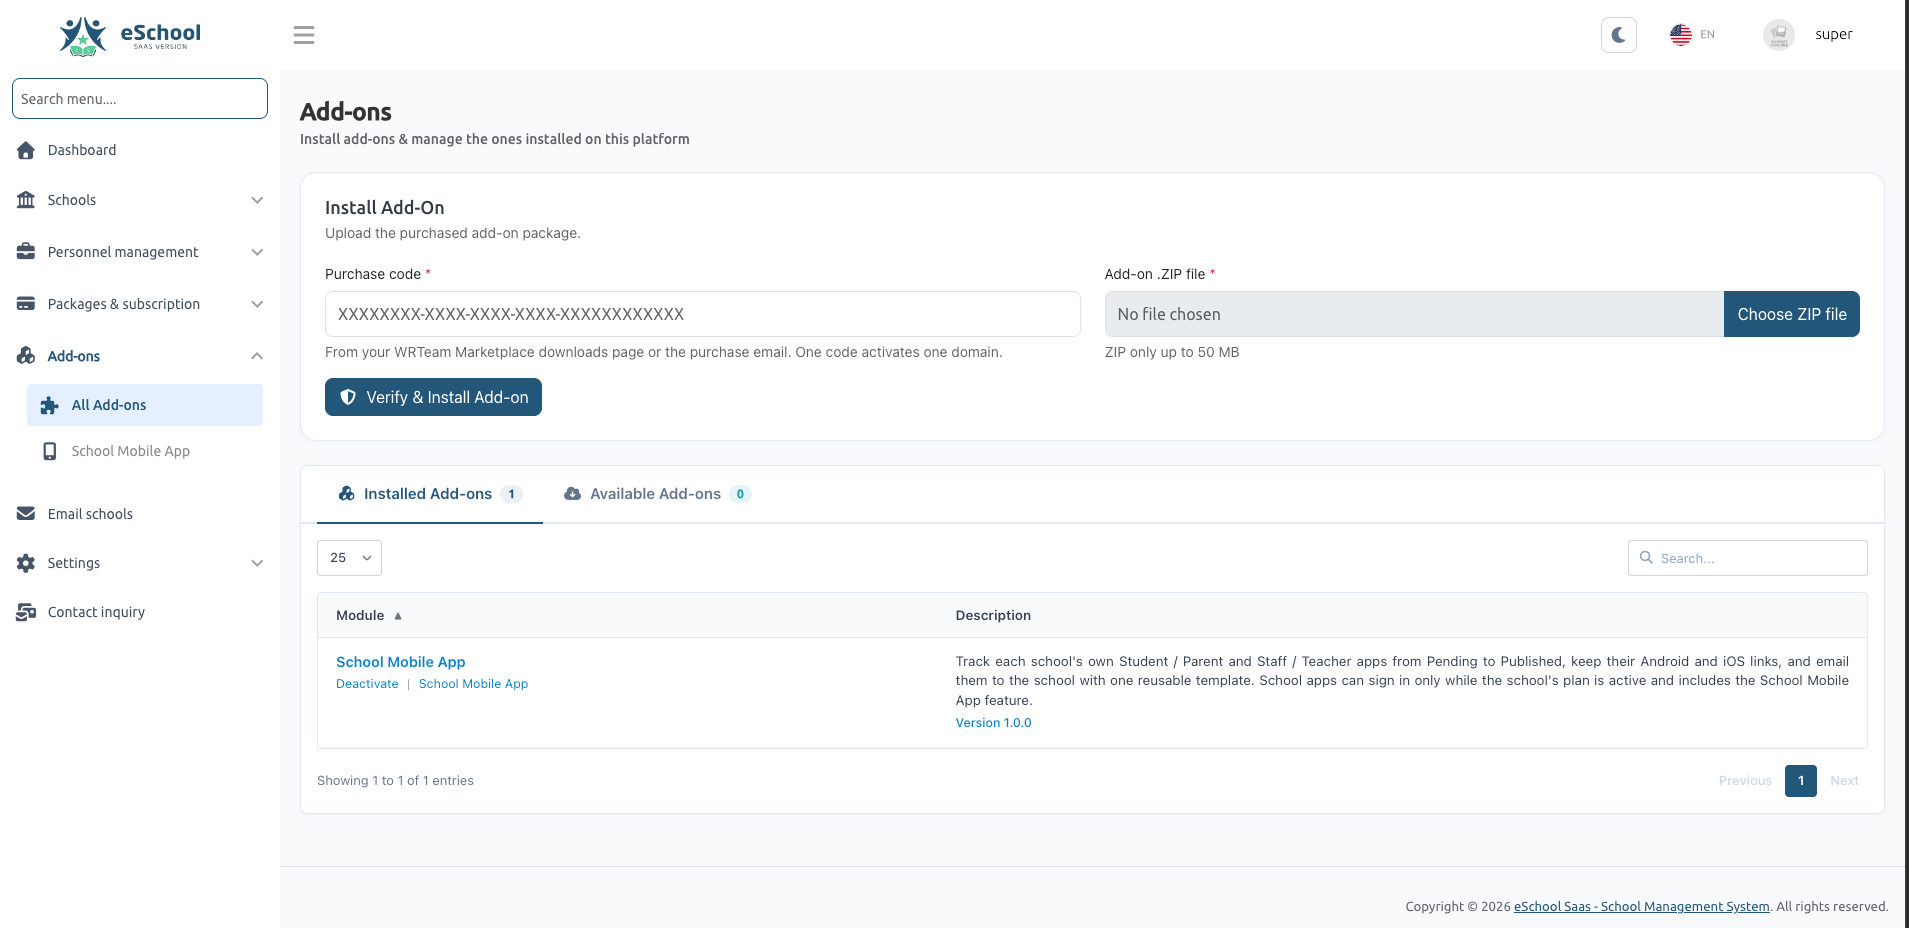
Table of Contents
- Overview & Architecture
- How the Add-on System Works
- Step-by-Step: Installing an Add-on Module
- Managing Installed Add-ons
- Server Requirements & Directory Permissions
- Troubleshooting & Frequently Asked Questions (FAQ)
1. Overview & Architecture
What are Add-on Modules?
The Add-on Module System in eSchool SaaS provides a robust, pluggable architecture. It enables the Super Administrator to expand the platform's core capabilities by uploading modular code packages (.zip) directly from the web interface.
Each add-on module:
- Lives in its own isolated directory under
/Modules/<ModuleName>/. - Has its own routes, controllers, views, database migrations, and service providers.
- Can be independently enabled, disabled, or updated without touching or risking core application files.
- Is verified against the official WRTeam license server before installation.
+-----------------------------------------------------------------------------------+
|                            eSchool SaaS Super Admin                               |
|                  Super Admin Panel -> Add-ons (/addon-modules)                    |
+-----------------------------------------+-----------------------------------------+
                                          |
                                          v
+-----------------------------------------------------------------------------------+
|                               Add-on Architecture                                 |
+-----------------------------------------------------------------------------------+
|  1. AddonInstallerService     -> Inspects, verifies license, stages & migrates    |
|  2. AddonRegistry             -> Boots active descriptors & status listeners      |
|  3. AddonCatalogService       -> Manages installed modules & UI cards             |
+-----------------------------------------+-----------------------------------------+
                                          |
                +-------------------------+-------------------------+
                |                                                   |
                v                                                   v
    +-----------------------+                           +-----------------------+
    | Modules/<AddonNameA>  |                           | Modules/<AddonNameB>  |
    | (Installed Module A)  |                           | (Installed Module B)  |
    +-----------------------+                           +-----------------------+
Difference Between Add-on Modules and Package Addons
To avoid confusion, note the fundamental difference between the two concepts in eSchool SaaS:
| Feature | Add-on Modules (/addon-modules) | Package & Subscription Addons (/package/addons) |
|---|---|---|
| What It Is | Physical code packages (Modules/*) installed on the server. | Commercial billing addons configured by the Super Admin to sell features to schools. |
| Target Audience | Platform Owner (Super Admin). | School Tenants (School Admins). |
| Purpose | Adds new system-wide capabilities, APIs, and administrative modules to the platform. | Allows schools to purchase optional subscription features (e.g. extra student capacity, specific core modules). |
| Installation | Requires uploading a verified .zip package with a purchase code. | Configured directly in the database via the Super Admin subscription package manager. |
2. How the Add-on System Works
Two-Stage Safe Installation Process
Installing code on a production server must never break running services. eSchool SaaS splits the installation into two distinct HTTP requests:
-
Stage Request (
POST /addon-modules/install):- Receives the uploaded
.zipand purchase code. - Unpacks the archive into a temporary sandbox folder (
Modules/.staging/<uuid>). - Verifies the package manifest (
module.json), composer requirements, file safety, and license. - Backs up the existing version (if updating).
- Atomically swaps the module files into
/Modules/<ModuleName>/while keeping the module disabled.
- Receives the uploaded
-
Finish Request (
POST /addon-modules/install/{key}/finish):- Executes in a clean PHP process where stale in-memory classes are not loaded.
- Clears application caches (
config:clear,route:clear,view:clear). - Runs database migrations specific to the module (
Modules/<ModuleName>/Database/Migrations). - Runs the add-on's dedicated installer class (e.g., seeding default templates and features).
- Activates the module in
storage/app/modules_statuses.json. - Records the installation in the
addon_installationsdatabase table.
Automatic Rollback & Self-Healing
If any step fails during the finish stage (such as a database query failure or syntax error):
- Automatic Rollback: Newly created migrations are rolled back immediately.
- File Restoration: If updating, the previous working version is automatically restored from
Modules/.backups/<key>/. If a fresh install fails, problematic files are moved intoModules/.failed/for inspection. - Zero Downtime: The platform remains completely stable, and the active state of the rest of the SaaS is unaffected.
License Verification
Before any add-on code is placed on the server, eSchool SaaS contacts the official WRTeam validation gateway.
The verification verifies:
- Purchase Code Authenticity: Verifies that the purchase code is valid and issued for the specific add-on.
- Domain Binding: Validates that the purchase code is registered to the active eSchool SaaS domain.
- Package Integrity: Verifies the package against official release builds to prevent tampered or corrupted files from being installed.
3. Step-by-Step: Installing an Add-on Module
Prerequisites
Before uploading an add-on, make sure:
- You are logged in with the Super Admin role.
- You have purchased the add-on from the WRTeam Marketplace.
- You have your Purchase Code (received via email or found under your marketplace Downloads page).
- Your server meets the minimum upload limits (recommended:
upload_max_filesize = 50M,post_max_size = 50M). - Outbound HTTPS connectivity from your server is active (cURL enabled) to communicate with the license server.
The Add-on installation form is automatically disabled on public demo installations to protect the server environment.
Navigating to the Add-ons Page
- Log in to the Super Admin Panel.
- In the left navigation sidebar, click Add-ons.
- The page displays the Install Add-on card at the top, followed by the Installed Add-ons list below.
Uploading & Verifying the Package
- In the Purchase Code field, enter your valid license purchase code (format:
XXXXXXXX-XXXX-XXXX-XXXX-XXXXXXXXXXXX). - In the Add-on ZIP File field, click Choose ZIP File and select the official
.zipfile of the add-on. - Click Verify & Install Add-on.
The 7-Step Automated Installation Sequence
Once you click install, an interactive step-by-step progress checklist appears on the screen:
[✓] Package uploaded
[✓] Package structure valid
[✓] Compatible with this server
[✓] Purchase code verified
[✓] Files installed in Modules
[✓] Database updated
[✓] Add-on registered
| Step | Technical Name | What Happens Behind the Scenes |
|---|---|---|
| 1 | upload | The .zip file is safely uploaded to storage/app/addons/uploads/ and checked against size limits. |
| 2 | package | The archive is inspected in memory. It verifies module.json, verifies PSR-4 autoloading in composer.json, and blocks unauthorized file formats (e.g. .exe, .bat, .sh, .phar, .env). |
| 3 | compatibility | Checks compatibility constraints declared in module.json (Core version, PHP version, and required PHP extensions). |
| 4 | license | Communicates with the WRTeam license server, validating the purchase code, domain, and file integrity. |
| 5 | files | Files are atomically extracted into /Modules/<ModuleName>/. Existing files (if updating) are backed up. |
| 6 | database | Runs database migrations for the module and executes the custom installer class (seeding necessary tables and settings). |
| 7 | register | The module is registered with Laravel, marked true in modules_statuses.json, and the system cache is rebuilt. |
When finished, a green success message appears, and the page automatically refreshes to display the newly installed add-on.
4. Managing Installed Add-ons
Understanding Add-on Cards & Details
Every installed add-on is represented as an informative card containing:
- Icon & Title: The branding icon and official title of the add-on.
- Vendor: Name of the developer or organization (e.g.,
by WRTeam.). - Description: Summary of what the add-on does.
- Version: The currently installed release version (e.g.,
1.0.0). - Installation Status Badge:
- Installed: The add-on is fully installed and operational.
- Setup incomplete: The package was uploaded and staged, but the database step has not completed.
- Not loaded: The module files exist, but the module is switched off in
modules_statuses.json. - Files missing: An installation record exists in the database, but the physical folder in
/Modules/cannot be found.
- Verification Note: Shows the date installed and confirms that the purchase code is verified on record.
Activating & Deactivating Add-ons
Each add-on card includes an Add-on Status switch (Active / Inactive):
- Setting to Inactive:
- Toggle the switch to off.
- If the add-on defines a deactivation notice, a confirmation modal will display explaining the impact.
- Confirming turns off the module's routes, menus, and background event listeners.
- Data is NOT deleted: Disabling an add-on preserves all database records, settings, and associations.
- Setting to Active:
- Toggle the switch to on.
- The module's routes, permissions, and navigation menus are immediately re-enabled.
Handling Incomplete or Failed Installations
If an installation is interrupted (for example, server timeout during migration or network disconnect):
- The card displays a yellow Setup incomplete badge.
- The last known error message is displayed in a warning banner.
- Two action buttons become available:
- Finish installation: Retries the database migration and registration step.
- Cancel: Removes the newly staged files and cleanly restores the previous version (if updating) or removes the staged files completely.
Accessing the Add-on Management Panel
When an add-on is Active and provides a Super Admin management interface, a Manage → button appears on the right side of the card. Clicking this button takes you directly to the add-on’s main control panel (or you can use the newly added menu item in the left sidebar).
If an add-on is set to Inactive, the Manage button is disabled with a tooltip reminding you to activate the add-on first.
5. Server Requirements & Directory Permissions
PHP Upload Limits
Because add-on modules contain source code, templates, and compiled assets, ensure your php.ini file accommodates file uploads:
; Recommended settings in /etc/php/8.2/fpm/php.ini (or equivalent)
upload_max_filesize = 50M
post_max_size = 50M
max_execution_time = 300
memory_limit = 256M
After modifying php.ini, restart your web server or PHP-FPM service:
sudo systemctl restart php8.2-fpm
sudo systemctl restart nginx # or apache2
Working Directories & Permissions
Ensure the following directories exist and are writable by the web server user (www-data or apache):
| Directory | Purpose | Permissions |
|---|---|---|
Modules/ | Permanent location of all installed module directories | 775 (writable) |
Modules/.staging/ | Temporary sandbox for extracting and validating ZIP packages | 775 (writable) |
Modules/.backups/ | Automated backup copies created prior to upgrading an add-on | 775 (writable) |
Modules/.failed/ | Stores files of failed installations for debugging | 775 (writable) |
storage/app/addons/uploads/ | Stores raw uploaded ZIP files during processing | 775 (writable) |
6. Troubleshooting & Frequently Asked Questions (FAQ)
Q1: The installer says: "The add-on ZIP may not be larger than X KB."
Cause: The ZIP file exceeds the limit defined in PHP's upload_max_filesize or post_max_size.
Fix: Increase upload_max_filesize and post_max_size to 50M in your php.ini, restart PHP-FPM / Apache, and retry.
Q2: Error: "Could not reach the add-on license server."
Cause: Your web server cannot establish an outbound HTTPS connection to the license verification server.
Fix:
- Check that cURL is enabled:
php -m | grep curl. - Verify outbound network connectivity from your server.
- Ensure server firewalls (UFW, iptables, Cloudflare Tunnel, or AWS Security Groups) allow outbound port
443traffic.
Q3: Error: "This package is not a release the license server knows."
Cause: The uploaded ZIP file has been altered, re-archived, or corrupted.
Fix: Download the clean, original .zip package directly from your marketplace Downloads page and upload it without extracting or re-compressing it.
Q4: Error: "Another add-on installation is running. Try again in a few minutes."
Cause: A previous upload was aborted or interrupted, leaving an active cache lock.
Fix: The lock expires automatically after 15 minutes. To clear it immediately, run:
php artisan cache:clear
Q5: Can I manually enable or disable an add-on from the terminal?
Answer: Yes. The platform uses standard Laravel Modules commands:
# List all modules and their statuses
php artisan module:list

# Enable an installed module
php artisan module:enable <ModuleName>

# Disable an installed module
php artisan module:disable <ModuleName>

# Clear framework caches
php artisan optimize:clear